Buy Surron Light Bee Battery Transfer Cable Online In Europe
Buy Surron Light Bee Battery Transfer Cable Online In Europe is a critical piece of hardware in any Sur-Ron battery swap, dual battery system, or power distribution setup. In this comprehensive guide, we’ll delve deep into the specifics of the Sur-Ron Light Bee Battery Transfer Cable—what it is, why it’s needed, how it works, how to install it, and everything in between.
2. What is a Battery Transfer Cable?
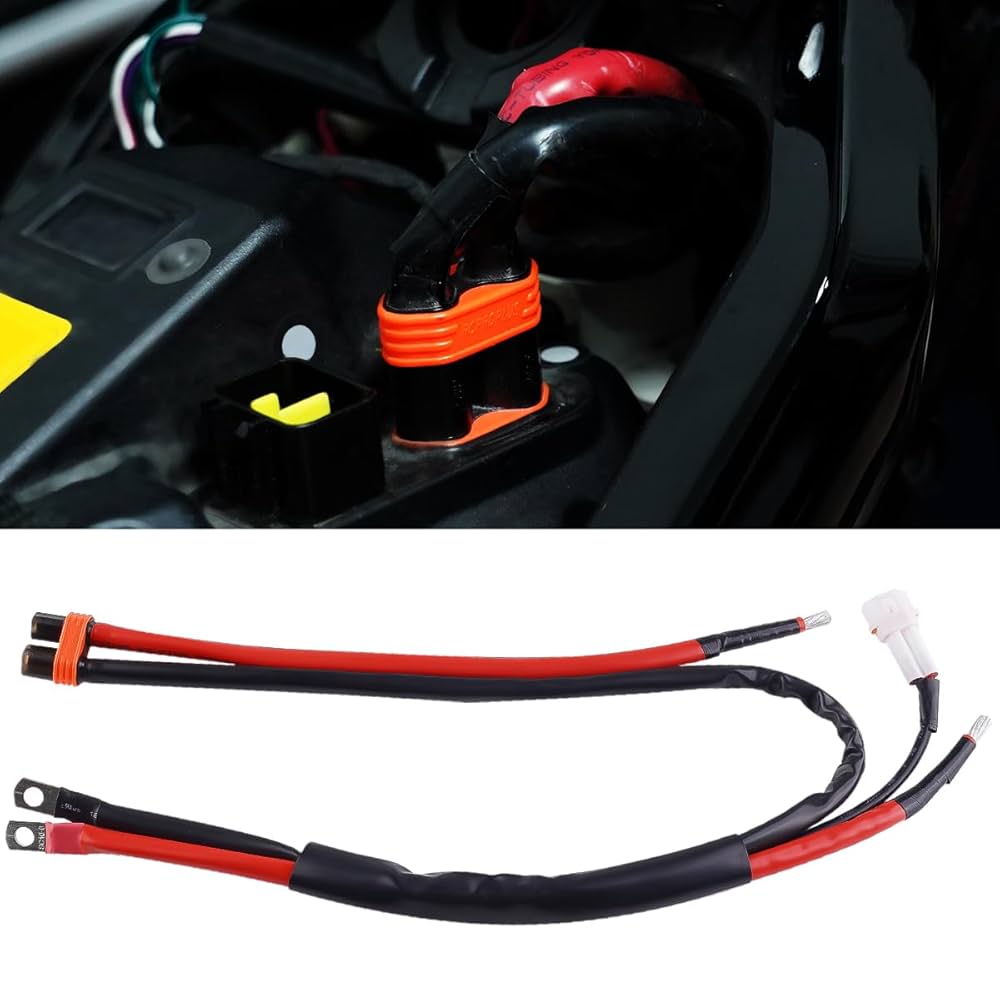
A Battery Transfer Cable in the context of electric bikes like the Sur-Ron Light Bee is a high-current, heavy-gauge cable assembly designed to transfer energy from one power source (battery) to the vehicle’s electrical system or between two batteries.
In particular, Buy Surron Light Bee Battery Transfer Cable Online In Europe is designed to:
-
Connect a secondary battery to the existing system.
-
Allow battery swaps without wear on internal connectors.
-
Enable parallel or series setups depending on build.
-
Transfer high current from battery to motor/controller safely and efficiently.
It typically comes with high-quality connectors (like QS8, XT90, or Anderson), thick silicone-insulated copper wiring, and heat-resistant sheathing. These cables are specifically designed to handle the high amperage drawrequired by upgraded controllers and motors on high-performance Light Bees.
3. Why is It Important?
The battery transfer cable isn’t just a wire—it’s the bridge between energy and performance. The stock Sur-Ron Light Bee battery comes with a rated capacity (e.g., 60V 32Ah or 38Ah), which is sufficient for casual use. However, for advanced riders who:
-
Upgrade to 72V systems
-
Run dual battery systems for extended range
-
Use high-powered controllers (e.g., ASI BAC8000, EBMX X-9000)
-
Do battery maintenance and testing
…a dedicated transfer cable is vital.
It allows for:
-
Faster energy delivery
-
Safer, more reliable connections
-
Reduced voltage drop
-
Compatibility with aftermarket batteries
-
Ease of installation/removal during swaps or charging
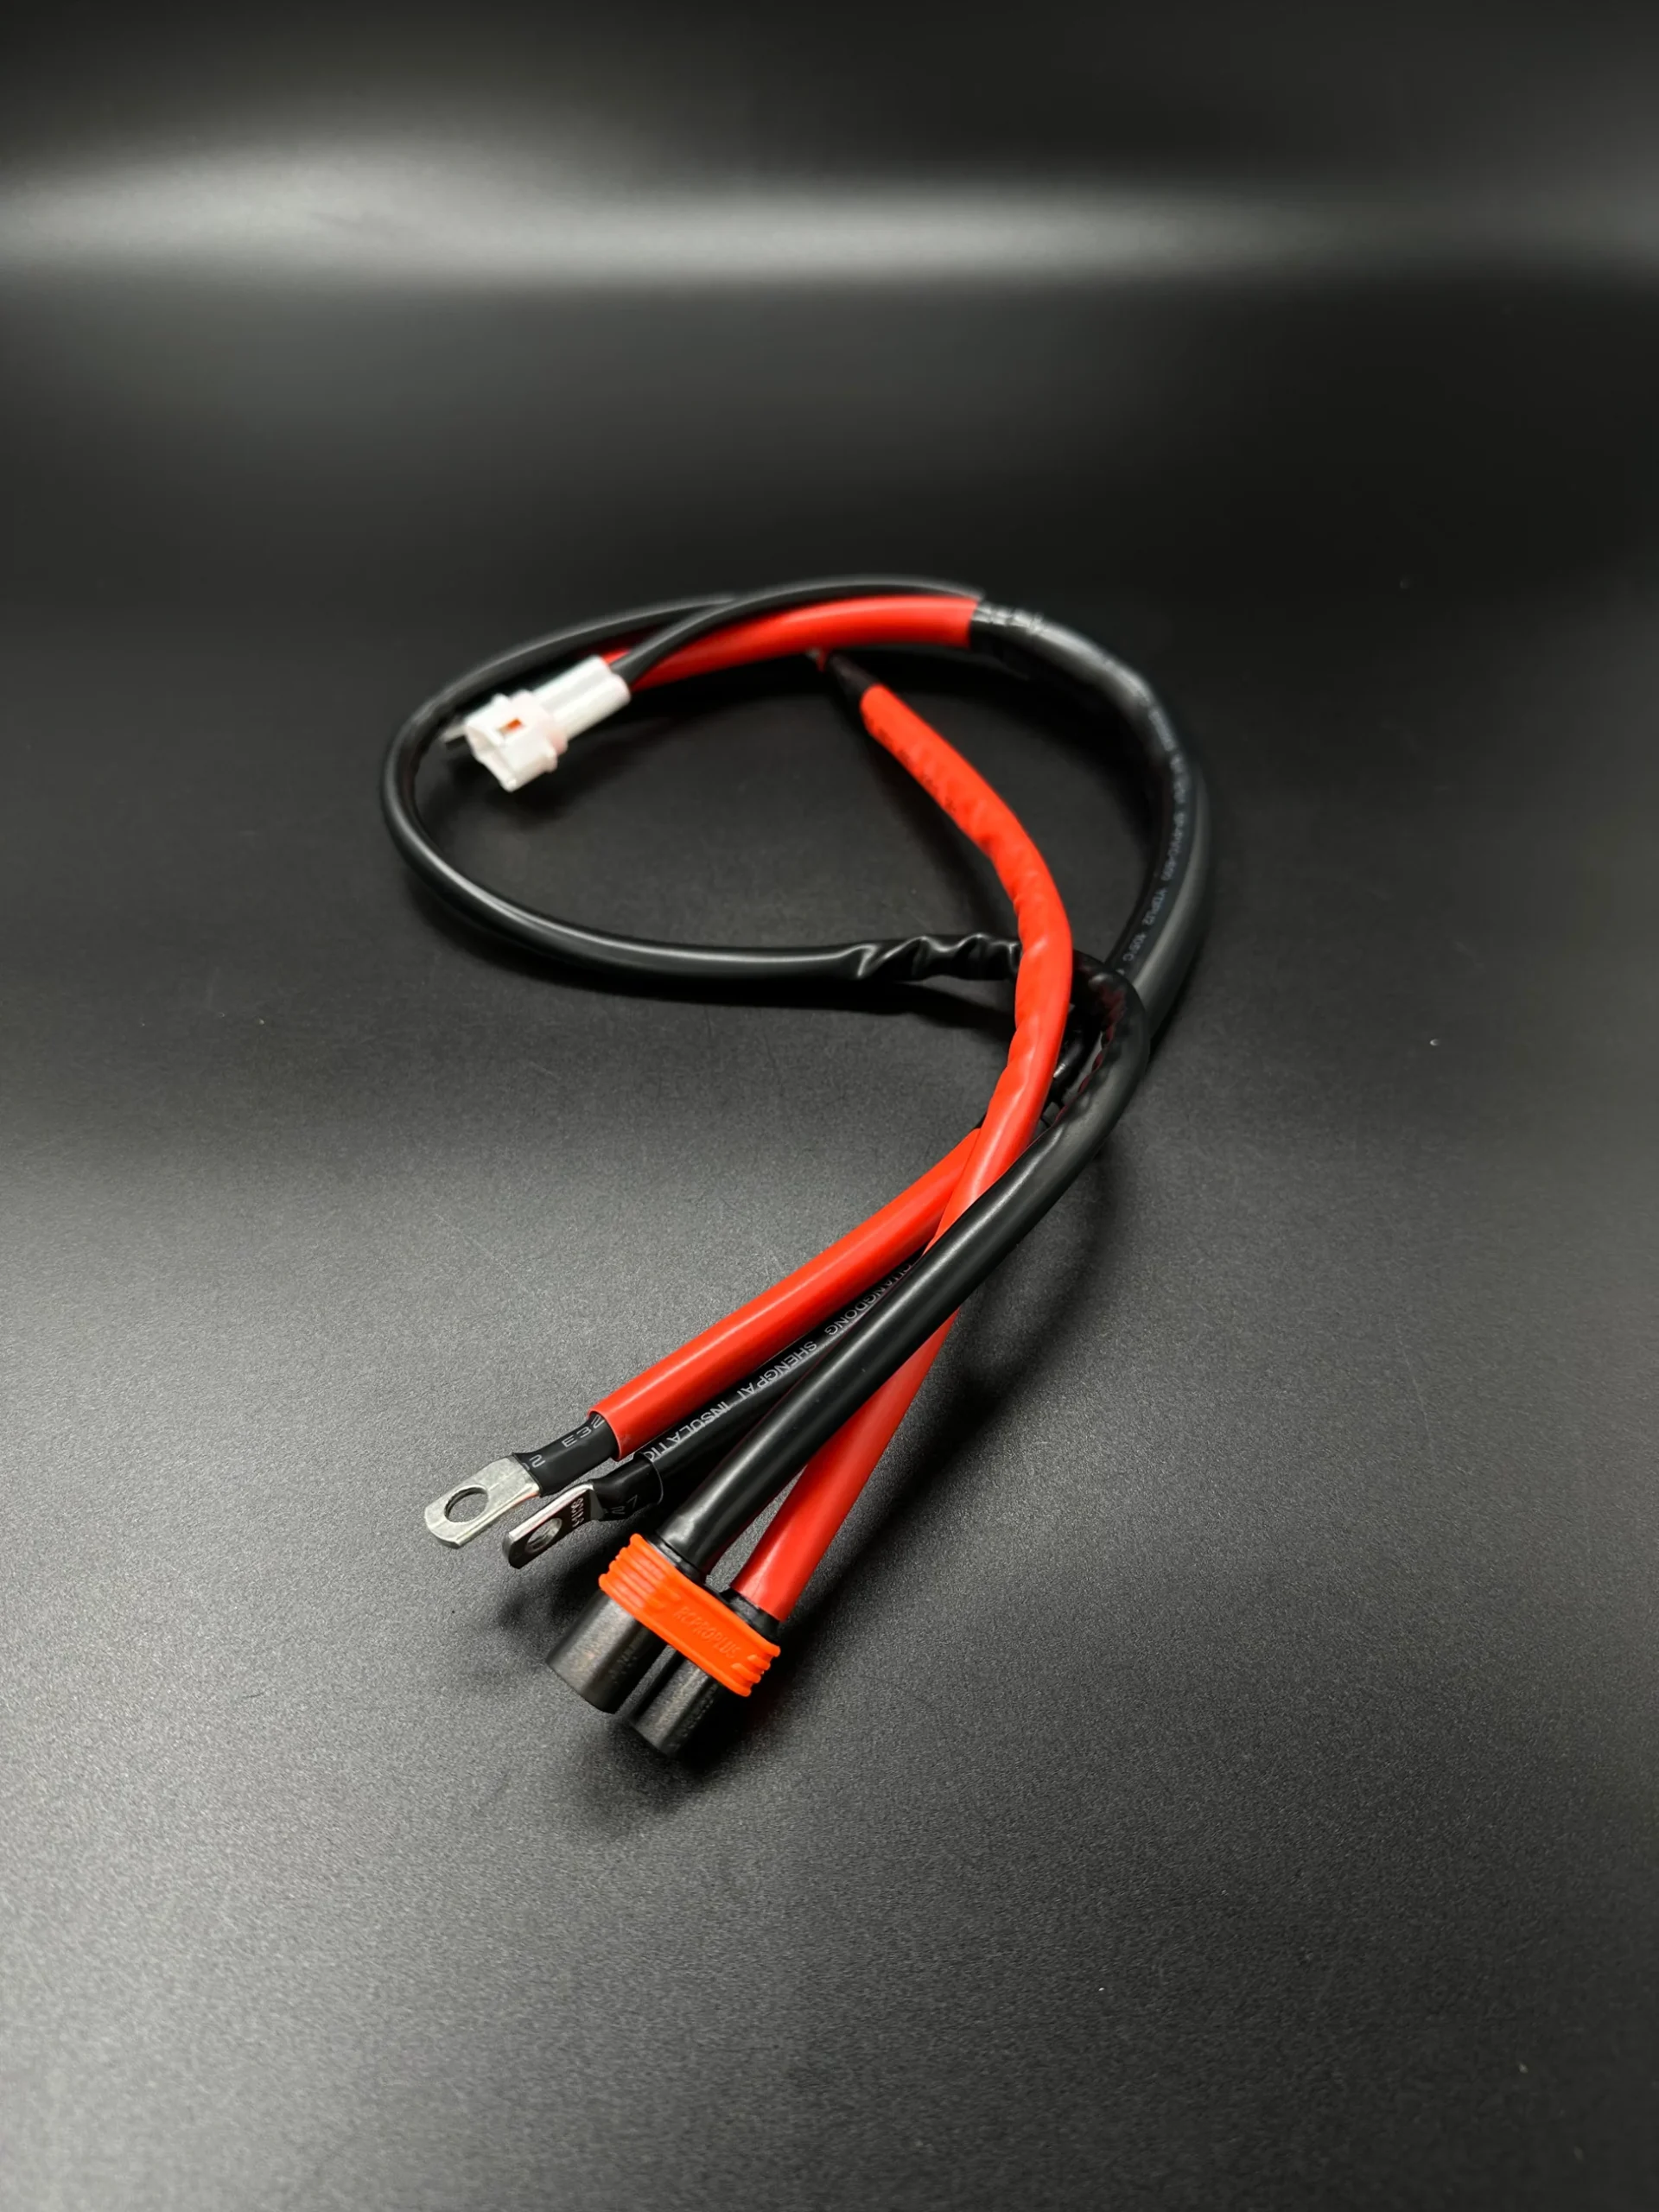
4. Construction and Components
4.1 Cable Materials
-
High-Strand Count Copper Wire: Offers maximum conductivity and flexibility.
-
Silicone Insulation: Rated for high temperatures, offering protection in off-road, muddy, and wet conditions.
-
Gauge: Most transfer cables use 8 AWG to 4 AWG, depending on power needs.
-
Length: Ranges from 30cm to 1m depending on setup (longer for dual battery installs).
4.2 Connectors
There are several connector options, each chosen based on current and voltage ratings:
| Connector | Current Rating | Typical Use |
|---|---|---|
| XT90-S | 90A | Stock and mild upgrades |
| QS8-S Anti-Spark | 180A | High-power systems |
| Anderson SB120/SB175 | 120–175A | Custom heavy-duty builds |
Most transfer cables use anti-spark connectors, which eliminate the spark that typically happens when connecting a live high-voltage system.
4.3 Protective Layers
-
Heat Shrink Tubing: For terminal insulation.
-
Braided Sleeving: For abrasion protection.
-
Nylon Sheathing: In heavy-duty versions for extra durability.
5. Use Cases
5.1 Battery Swapping
When swapping batteries frequently (for race events or extended rides), a transfer cable allows quick connect/disconnect without wearing out or damaging the internal wiring harness.
5.2 Dual Battery System
One of the most popular use cases. A transfer cable connects a second battery in parallel to the stock system to:
-
Double the range
-
Distribute current load
-
Avoid overheating a single battery
Requires a voltage matching circuit or smart BMS for safety.
5.3 72V Conversion
Upgrading from 60V to 72V increases power output dramatically. The transfer cable in this case:
-
Must be rated for ≥100V and 150–200A
-
Ensures the controller gets enough current
-
Avoids bottlenecks and heat buildup
5.4 External Charging or Testing
Advanced users might use transfer cables with external charging setups, battery balancers, or voltage readouts. Some cables include:
-
In-line fuses
-
Voltage displays
-
Switches for quick power kill
6. Technical Specifications
Here’s a breakdown of typical specs of a Sur-Ron battery transfer cable:
| Specification | Value |
|---|---|
| Voltage Rating | 72V–100V DC |
| Max Current | 120A–200A continuous |
| Cable Gauge | 8 AWG (light), 6 AWG (medium), 4 AWG (heavy-duty) |
| Resistance | < 0.5 milliohms |
| Insulation | Silicone, Heat Shrink |
| Connector Type | XT90S / QS8 / Anderson |
| Operating Temp | -40°C to +200°C |
| Length | 30cm–100cm |
| Weight | 250g–500g (depends on gauge and length) |
7. Installation Guide
7.1 Tools Needed
-
Allen wrenches
-
Electrical tape
-
Wire cutters/strippers
-
Multimeter
-
Heat gun (if installing shrink tubing)
-
Zip ties or cable organizers
7.2 Step-by-Step Installation
Step 1: Power Down
-
Turn off the bike.
-
Disconnect the battery and controller if needed.
Step 2: Identify Connection Points
-
For stock battery replacement: locate the battery discharge port.
-
For dual battery: find the entry point for parallel wiring.
Step 3: Connect Cable
-
Align male and female connectors.
-
Insert firmly until you hear a click (especially for QS8s).
Step 4: Secure Routing
-
Use zip ties to avoid cable movement during rides.
-
Avoid pinch points and sharp bends.
Step 5: Testing
-
Use a multimeter to check continuity.
-
Power on and monitor voltage.
-
Test under load and ensure no overheating.
Step 6: Ride Test
-
Ride under throttle for 5–10 minutes.
-
Recheck all connection points after the ride.
8. Compatibility
The Sur-Ron Light Bee battery transfer cable is generally compatible with:
-
Sur-Ron Light Bee X
-
Sur-Ron Light Bee Youth / Standard
-
Segway X160/X260 (with minor modifications)
-
Talaria Sting / MX3 / R
-
Aftermarket battery packs (Chi Battery Systems, LiteSpeed, EBMX, etc.)
Ensure the connector type matches your battery and controller setup. Some setups require adapter cables or connector swaps.
9. Safety Considerations
9.1 Avoid Arcing
Always use anti-spark connectors (like XT90-S or QS8-S) to prevent voltage arcing, which can damage components.
9.2 Watch for Overcurrent
Ensure cable gauge is appropriate. Underrated cables can:
-
Overheat
-
Melt insulation
-
Pose fire risk
9.3 Voltage Matching
Never mix batteries of different voltages or charge states without a battery balancer or BMS. This can result in:
-
Overcharging
-
Thermal runaway
-
Battery damage
9.4 Weather Protection
Use waterproof connectors or seal with dielectric grease and rubber boots if riding in wet or muddy environments.
10. Buying Tips
What to Look For:
-
Cable rating (match your controller and battery)
-
Genuine anti-spark connectors
-
Heavy-duty silicone insulation
-
Proper length for your setup
-
Seller reputation and warranty
Price Range:
-
Entry-level XT90S cables: $15–$30
-
QS8 8 AWG cables: $30–$60
-
Custom heavy-duty kits: $70–$120+
Recommended Sellers:
-
ChiBatterySystems
-
LiteSpeed Bikes
-
EBMX
-
Electrify Bike Co
-
DIY eBike builders (Etsy, eBay, forums)
11. Maintenance Tips
-
Inspect monthly for cracks, corrosion, or loose connectors.
-
Clean with contact cleaner if exposed to mud or water.
-
Re-wrap or replace heat shrink if damaged.
-
Replace connectors if you see arc marks or melting.
12. Conclusion
The Sur-Ron Light Bee Battery Transfer Cable may seem like a minor component in your electric dirt bike’s setup, but its role is anything but minor. It serves as the lifeline between battery and motor, ensuring that power flows efficiently, safely, and reliably—especially when you’re pushing your machine to the limits.
Whether you’re looking to extend your range with a second battery, boost your voltage for serious performance, or just simplify your battery swaps, a high-quality transfer cable is essential.
Invest in the right one for your needs, install it carefully, and maintain it regularly. That small effort goes a long way toward unlocking the full potential of your Sur-Ron Light Bee.
Reviews
There are no reviews yet.